
Exhibitors are the lifeblood of many events, and they often want to invite their top clients to walk the trade show floor. However, a common nightmare for planners is discovering that an exhibitor’s “guest” accidentally registered for a $500 premium workshop for free because the system couldn’t tell the difference between a booth staffer and a client.
To prevent this, you must strictly separate your registration logic. Here is how to configure Cvent so exhibitors can register their guests smoothly, while locking down what those guests can actually access.
1. Create a Dedicated "Exhibitor Guest" Registration Type
Before you build any forms, you need to define the audience in the backend. If an exhibitor and their guest share the same Registration Type, they will share the exact same permissions.
How to Set It Up:
Navigate to General > Registration Types.
Click Create Registration Type.
Name it Exhibitor Guest (and ensure you already have one named Exhibitor Staff).
Click Save. This tag is the foundation for all your security rules.
2. Configure the Guest Registration Flow
In modern Cvent, setting up guests is a two-part process. First, you add the button for the primary attendee to bring a guest. Then, you lock down the specific page where the guest’s details are entered so they are forced into the correct Registration Type.
How to Set It Up:
From the Event navigation, hover over Registration, then click Registration Process.
Click Open Site Designer.
Part 1 (The Button): On your primary registration page, click Build. Under the Registration Actions section, drag the Guest Registration widget onto the canvas so the exhibitor has a button to add their guests.
Part 2 (The Assignment): In the top-left corner of the Site Designer, click the Registration Page dropdown menu.
Scroll down to the Other Pages section and click on Guest Information.
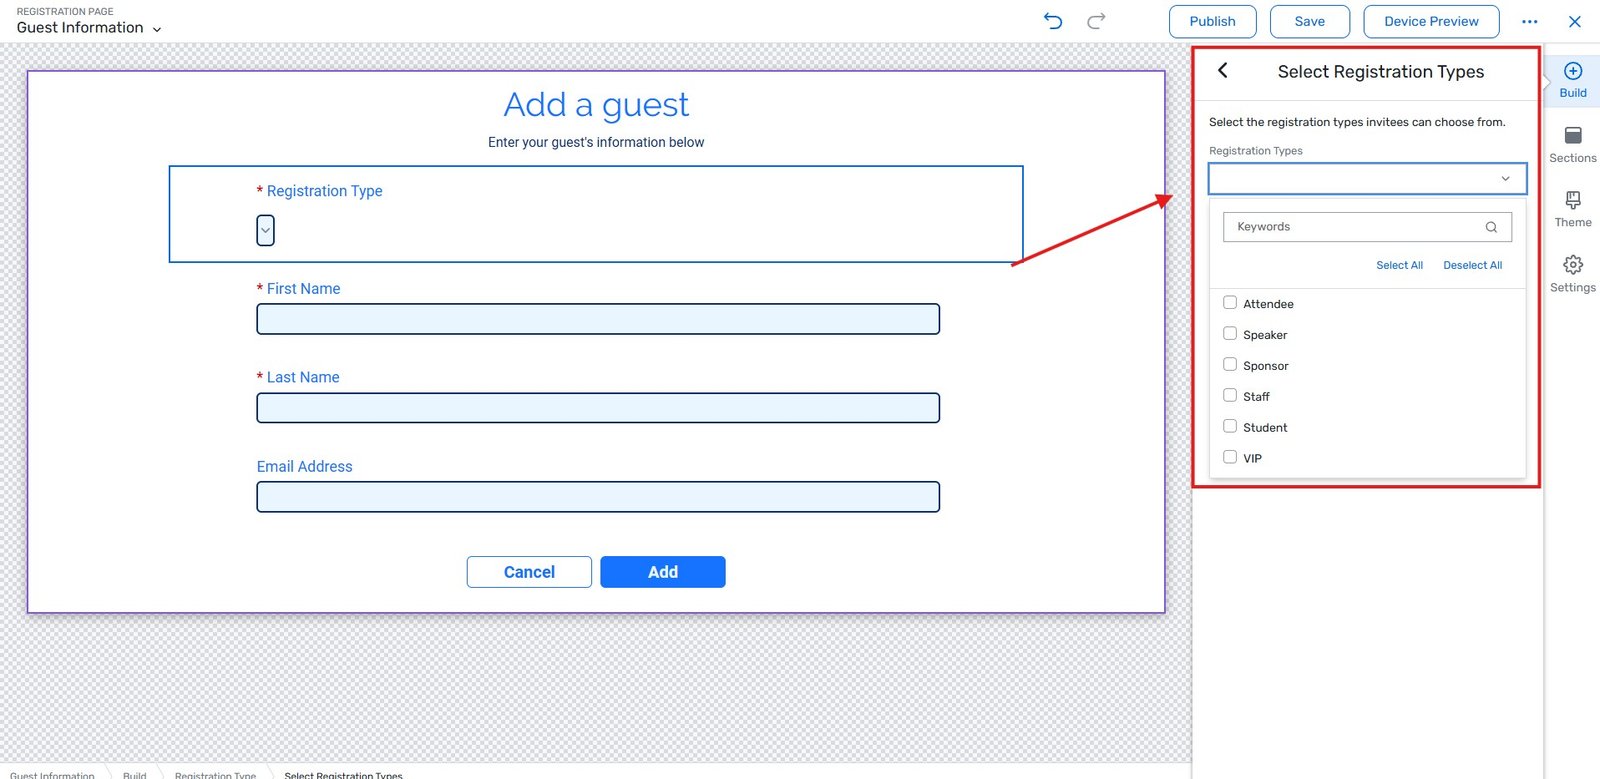
Click Build, and drag the Registration Type widget onto the canvas.
Crucial Step: Click on the Registration Type widget to open its settings. Toggle Limit available registration types to On. Click Select Registration Types and check only the Exhibitor Guest type you created in Step 1. (Make sure the widget is also toggled to “Required” so the system forces the assignment).
3. Lock Down Session and Ticket Access
Now that the system knows who the guests are, you must explicitly block them from registering for things they shouldn’t attend (like staff-only briefings or paid VIP dinners).
How to Set It Up for Tickets:
From the Event navigation, hover over Registration, then click Admission Items.
Open an admission item by clicking on its name.
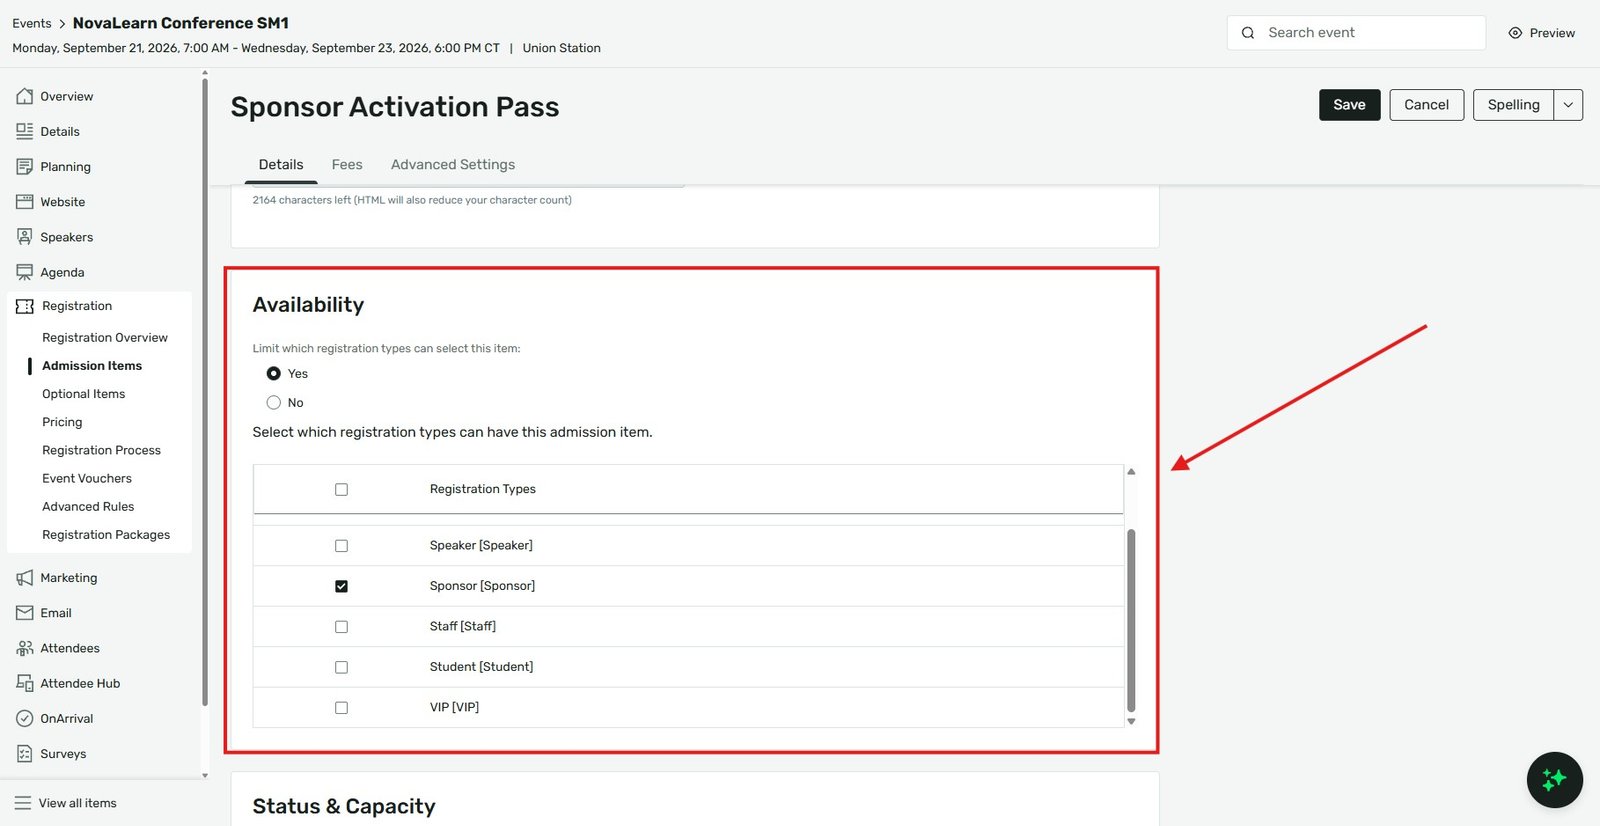
Click Edit. In the Availability section, switch “Limit which registration types can select this item” to Yes.
Check the boxes next to the allowed registration types (e.g., Exhibitor Staff) and deliberately leave Exhibitor Guest unchecked.
Click Save.
How to Set It Up for Sessions:
From the Event navigation, hover over Agenda, then click Session List.
Open your protected session by clicking on its name.
Scroll down to the Availability section and click Edit.
Toggle “Restrict session visibility” to Yes.
Just like with tickets, check the boxes for your allowed attendees and ensure Exhibitor Guest is left unchecked.
Click Save.
4. Design the Physical Badge for On-Site Security
Even if the digital registration is flawless, your on-site security guards need to visually distinguish a guest from a staff member at a glance.
How to Set It Up:
Navigate to OnArrival > Name Badges (or the Badge Designer tool).
Open your primary badge template.
Add a dynamic Text Field to the bottom of the badge.
Set the data tag to pull the Registration Type.
Alternative approach: Create a completely separate badge template with a bright red banner at the bottom that explicitly says “GUEST.” In the badge settings, set the Visibility Logic so that this specific template only prints if the attendee’s Registration Type is “Exhibitor Guest.”
Agency Pro-Tip: If you have a massive trade show and are using the Cvent Exhibitor Portal, do not use standard Guest Registration. Instead, use the Portal’s built-in “Task” features to allocate a specific number of Staff Badges and Guest Badges to each booth. This forces the Exhibitor Admin to manage their own team’s roster and takes the administrative burden completely off your agency.
Key Takeaways
Define the audience first: Always create a specific Registration Type for “Exhibitor Guest” before building your registration path.
Force the assignment: When configuring Guest Registration, explicitly force the system to assign the guest the new Registration Type so they don’t inherit the main exhibitor’s access.
Audit your sessions: Go through every single session and admission item to ensure availability is restricted and guests are explicitly locked out of premium content.
Visual badge cues: Configure your name badges to dynamically print the Registration Type or use color-coded templates so on-site staff can easily spot a guest on the trade show floor.