
When planners want to hide a specific page, text block, or hotel request form from certain attendees, they frequently ask how to use “Link Logic.” However, in Cvent’s terminology, Link Logic only applies to event registration questions.
If you want to hide entire pages or widgets based on who is registering, you actually need to use Visibility Logic and Registration Paths. Here is how to configure your Cvent Flex event so attendees only see what is relevant to them.
1. Hiding Specific Instructions (Widget Visibility Logic)
Instead of creating entirely different registration paths just to change a paragraph of text, you can use Widget Visibility Logic. This allows you to show or hide text widgets and contact fields based on an attendee’s agenda items, travel conditions, or specific contact fields.
How to Set It Up:
Open the Site Designer and navigate to your registration page.
Click on the Text or Contact Field widget you want to hide.
In the right-hand configuration panel, scroll down to the Visibility Logic section.
Set the criteria. For example, you can base visibility on Registration Type (which is found under contact fields) to ensure hotel instructional text only appears for out-of-town attendees.
2. Hiding Entire Custom Website Pages
If you built a custom website page (like a VIP agenda or a sponsor portal) and you do not want the general public to see it, you can easily lock it down in the page settings.
How to Set It Up:
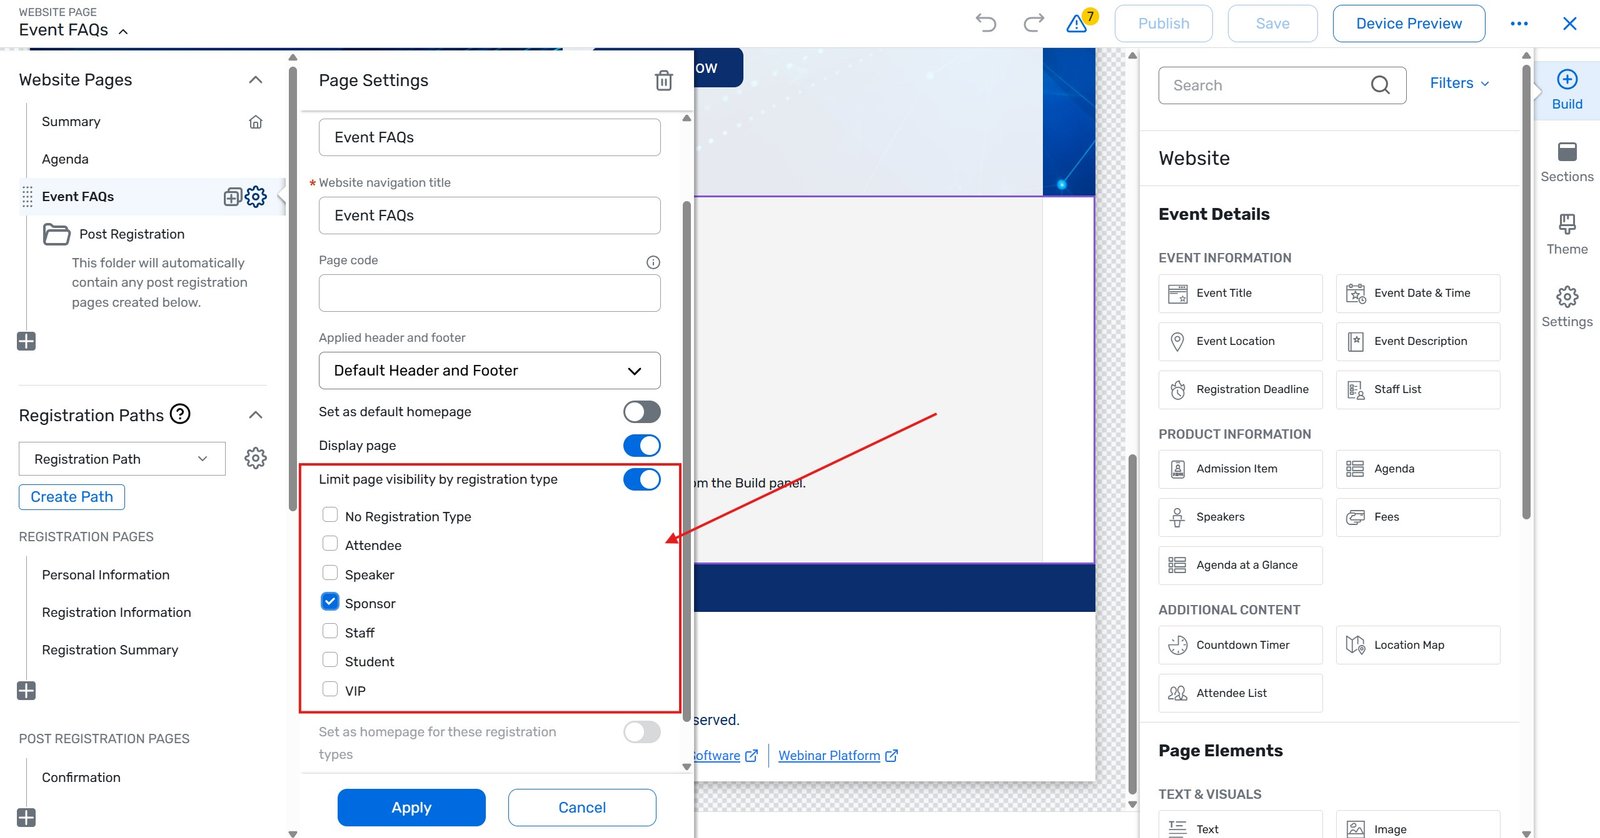
In the Site Designer, expand the Website Page menu in the top left.
Click the gear icon next to the custom page you want to hide.
Toggle “Limit page visibility by registration type” to blue.
Check the specific Registration Types (e.g., “Sponsor” or “VIP”) that are allowed to see the page. Anyone outside of that group will not see the page in their website navigation.
3. Hiding Registration Pages (Hotel & Travel)
If you want to completely hide a standard registration page—like the Hotel or Air Travel page—from local attendees, you cannot simply toggle a visibility switch on the page itself. You must use Registration Paths.
How to Set It Up:
Go to Registration > Registration Process.
Create a path for your locals (e.g., “Local Attendee Path”) and a separate path for travelers (e.g., “Traveler Path”).
In the Site Designer for the “Local Attendee Path,” completely delete the Hotel Request and Air Travel pages from the registration flow.
On the very first page of registration, ask attendees to select their Registration Type (Local vs. Traveler), which will automatically route them down the correct path, ensuring locals never see the travel pages.
4. What is "Link Logic" Actually For?
To clear up the terminology: Link logic lets you personalize a question’s answer choices based on a previous custom contact field or question’s response.
Example: You ask a Choice Question: “Do you have any dietary restrictions?”
If they select “Yes,” Link Logic triggers the follow-up question: “Please select your restriction (Vegan, Gluten-Free, etc.).”
To set this up, click your source question in the Site Designer, scroll to the Visibility Settings (or Logic section), and click Link Logic to map out the answer dependencies.
Key Takeaways
Know the terminology: Use Link Logic for questions, Widget Visibility for text/fields, and Registration Paths for entire registration pages.
Keep paths clean: Use Widget Visibility Logic to hide specific instructional text so you don’t have to build duplicate Registration Paths.
Lock down custom pages: Always toggle “Limit page visibility by registration type” for sensitive custom website pages.